An XML Sitemap, at its simplest, is a term used to describe a web page or site map that lists all the pages on a particular site. XML sitemaps are created using XML (Extensible Markup Language) and they provide information about a site’s structure and navigation.
An XML sitemap helps Googlebot crawl and index your site better. This means that it makes sure that every page on your site is indexed properly. The sitemap also tells Google where each individual page is located on your site.
An XML sitemap is essential for SEO purposes because it provides detailed information about your site. If you don’t have one, then you should create one immediately.
The XML sitemap is usually the primary means of page discovery, where Google can crawl your site and identify the pages and their overall structure. When your sitemaps are organized in such a way that allows this, Google can crawl and index your site much easier than normal.
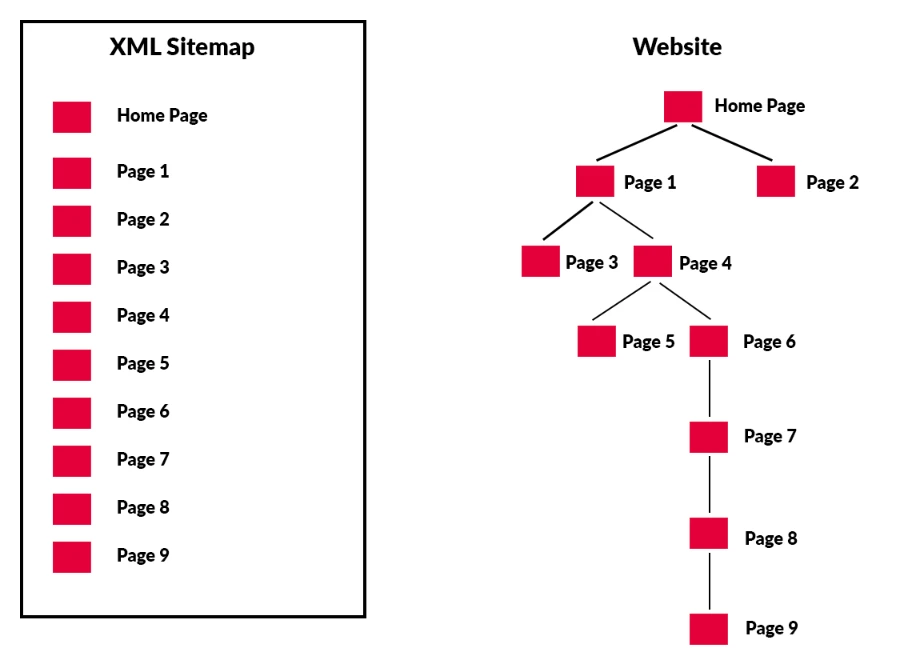
The following is a screenshot of what a sitemap is and how it reflects the website in general:
What Are XML Sitemaps?
An XML sitemap is simply a file that lists a web site’s essential pages, making it easier for search engines like Google to navigate your site and index it properly. This makes it possible for visitors to quickly locate what they’re looking for on your site, even if you’ve got lots of pages and subpages.
A good way to think about an XML sitemap is as a map. Think of each entry as a location on the map; each page listed there represents one of those locations. Each entry also includes information about where that page is located on the site, such as whether it’s a homepage, category page, etc. If you don’t include enough entries, Google may miss some of your most important pages — especially if you’ve got a lot of subpages.
What Do XML Sitemaps Look Like?
An XML sitemap is a standard format used to list web pages and blog articles. In it, you provide a link to each item, along with information such as how many times the article has been shared on social media, and whether it contains images. This makes it easier for search engines to crawl your site and index your content.
Here is an example of what an XML sitemap might look like when you access it on your web server:
An Example of an XML Sitemap
Let’s take a look at some examples.
Below, you’ll see a screenshot of the base XML sitemap to iloveseo.com. In this sitemap you’ll see all the different items on iloveseo.com and you’ll notice a date at the end of each line, indicated under “Last Mod.” Last Mod means “last modified.” This tells Google when each piece of content was last updated.
When a date changes in the site map, Google knows there’s new content to crawl and index. If you’re wondering why Yoast doesn’t use the same dates for every single sitemap, it’s because we’ve optimized each one individually based on the type of content and how often it gets updated.
The XML sitemap contains information about every single page on your site. For instance, it includes URLs, the last update date, the number of indexed pages, and much more.
The Yoast SEO plugin automatically creates an XML sitemap for you. This is done automatically on the installation of Yoast, unless there are major issues affecting the creation of your sitemap.
Below you can see an example of one of our XML sitemaps. As mentioned earlier, there are three types of posts that we included in our sitemap. These are news articles, blog posts, and podcasts.
You can also add custom URLs to the sitemap. For example, if you publish videos on YouTube, you could link to those videos directly within the sitemap. To learn more about creating an XML sitemap, check out our guide here.
What Types of Websites Need an XML Sitemap?
Google’s documentation says sitemaps help you make sure that Googlebot finds all your webpages. However, it doesn’t mention anything about how big your site must be to require a sitemap. In fact, it mentions that smaller websites don’t really need one. But what happens when you’ve got a really huge website? Do you really want Googlebot to crawl through each and every page manually?
Google’s documentation states that XML sitemaps are useful for “really large websites,” “websites with large archive,” “new websites with just a couple of external links,” and “websites which use Rich Media Content.” However, some websites don’t take advantage of the benefits of creating an XML sitemap.
According to Google, “proper internal linking should help us find all your content quickly,” and “it helps us understand how frequently you update your site. This information lets us make sure our algorithms are working properly.”
Unfortunately, there are many sites that do not give proper consideration to logical linking of their content. If you want to learn more about what makes an effective sitemap, check out this article.
Every website needs a sitemap. Why? Because Google wants to crawl your entire site efficiently. Google doesn’t care about specific parts of your site; it cares about crawling your whole site.
This is especially true for really big websites. They often have thousands of pages and hundreds of different types of content. These pages aren’t linked together very well internally. Therefore, a sitemap helps Google figure out how to navigate your site better.
To sum up, think about the size of your site. If your site is fairly small (less than 50,000 pages) you only need one sitemap. If your site is larger (over 50,000 pages) think about splitting your site up into smaller, more manageable sitemaps.
Which Pages Should Be in Your XML Sitemap?
The process of creating an XML sitemap is fairly simple. You just need to make sure that every URL included in the file is relevant. This includes URLs that are internal to your site, like those found in robots.txt files.
You can use Google Search Console to help you find URLs that aren’t being indexed properly. Once you’ve identified them, you’ll need to figure out why Google isn’t crawling them. For example, maybe they’re duplicates of another URL. Or perhaps you added a noindex meta tag by mistake.
Whether you’re just now starting to create a sitemap or you’re an experienced webmaster, start by asking yourself some questions about each one. Here are a few things to consider:
- Is the URL relevant?
- Does the page contain useful information?
- Will people find the page useful?
- Should the page be indexed?
The best way to determine whether a given URL needs to be included in your sitemap is to ask yourself these questions. If the answer to any of those questions is no, then you probably don’t need to add that URL to your sitemap.
How to Make Google Find Your Sitemap
Google has been known to take quite some time to crawl your site. This is especially true if you’re dealing with large amounts of data. But how long does it really take? And what do you need to do to speed up the process?
As a quick reminder, a sitemap allows you to provide information about every single page on your website. You can use it to inform Google about each individual URL and help it index those pages faster. In case you don’t know where to start, here are 3 simple steps to ensuring that Google can find and process your sitemap.
Step 1: Create Your Sitemap
The very first thing you need to do is create a sitemap. You can use any number of sitemap generators, or you can create your own. We prefer creating our own because it’s better and easier to keep track of code validation issues, and things like that.
Step 2: Submit Your Sitemap
To submit your sitemap, first, go to the left hand navigation menu on Google Search Console.
Click on “Sitemaps”.
Next, click on “Enter sitemap URL” and enter the path to where the sitemap file exists on your server.
Then, click on the Submit button.
Then, you can repeat this process for each type of sitemap you have.
Once you’ve submitted your sitemap, wait around for a few hours. After that, look out for an email notification telling you that Google has received your submission. Once you receive this message, you can rest easy knowing that Google has crawled your site. Indexation and ranking, however, are usually a different story, depending on the type of site you have, and how large your site is.
Step 3: Check Your Index Status
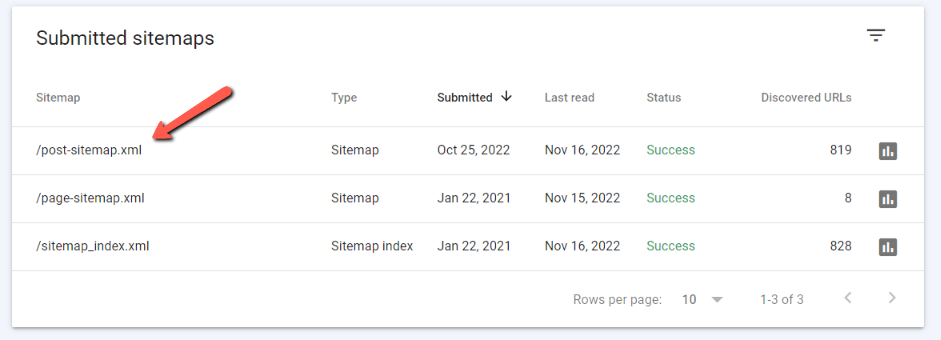
Now that Google has indexed your sitemap, it’s time to check its status. Go back to Google Search Console and click on the physical sitemap that shows up under “sitemaps”.
Next, click on the “See Index Coverage” button.
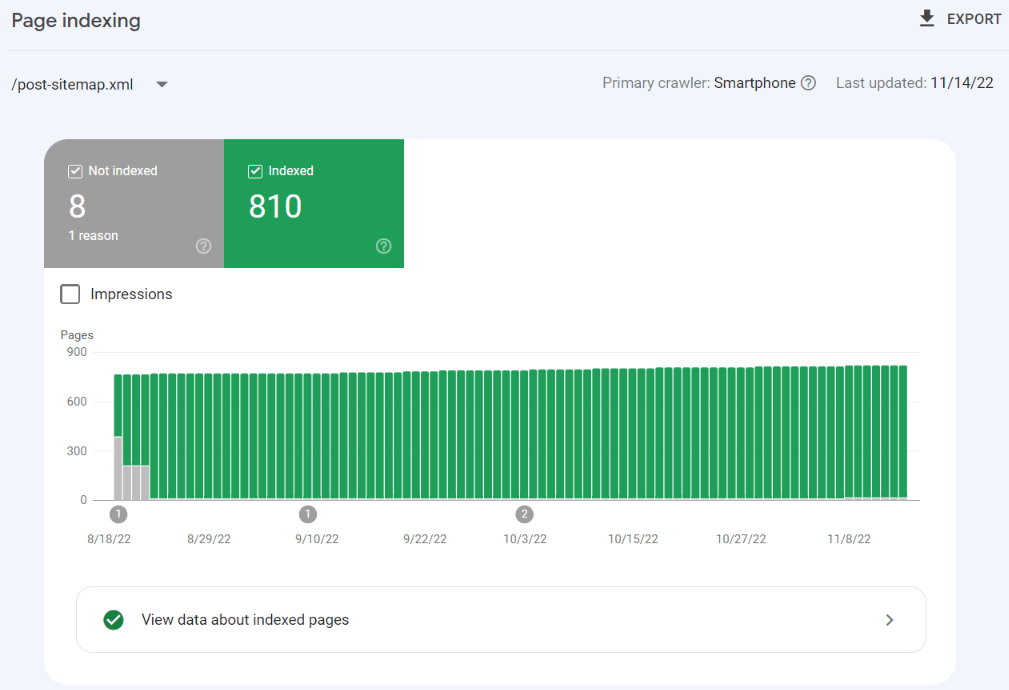
Here, you will see a console that shows you various index coverage attributes including things like URLs that are not indexed, and URLs that are indexed:
This section explains how your pages are indexed, and whether there are critical issues that need to be addressed on pages that are not indexed. Assuming you are doing everything right, you will be close to 100 percent indexation.
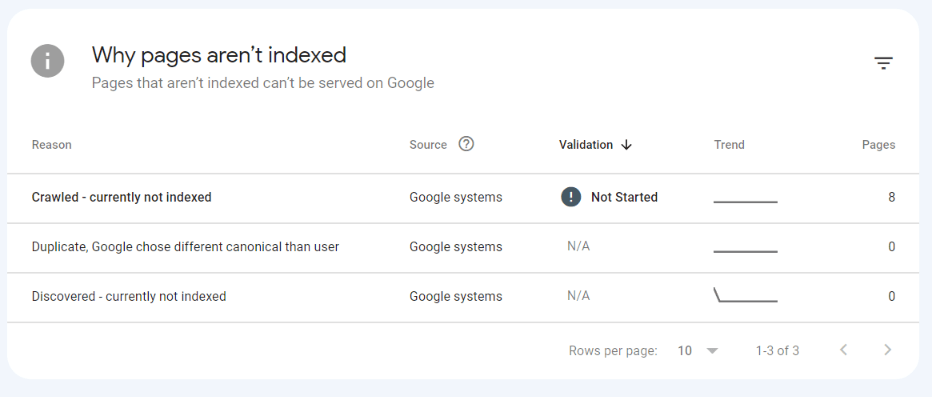
Here, you can dive in and find out exactly why your site’s pages are not indexed, and what you can do to improve them to ensure that they do become indexed.
What Happens When You Add Your Sitemap?
When you add a new sitemap, Google will immediately begin processing it. However, it won’t actually show up on any search results until it finishes. Also, ranking is not instant. It can take some time for Google to calculate and identify where your pages should be ranked, depending on many different factors.
Build and Submit a Sitemap
You’ll need to decide which type of sitemap you’d like to use. There are three main types of sitemaps: XML, HTML5, and RSS. Each has different benefits depending on your needs. For example, XML sitemaps are typically used for large sites because they’re easier to maintain. But, it’s worth noting that Google has deprecated the use of HTML sitemaps. Nowadays, XML sitemaps are the type you will want to use.
Once you’ve chosen which sitemap format you want to use, you’ll need to decide whether you want to generate the sitemap automatically or manually. There are a variety of options for generating your sitemap automatically, such as XML-Sitemaps.com, or using your favorite SEO plugin like Yoast or Rank Math.
If you generate it manually, you will need to upload it to your server or add it through WordPress by using a plugin.
Next, you’ll need to add your sitemap to your robots.txt file on your server. Robots.txt files are often located in the root directory of your website, but you can find yours by inputting the name of your domain, and adding the robots.txt file extension at the end of it. If you don’t have a sitemaps directive that looks like the below, you will want to add one.
In WordPress (or your FTP program…depending on how experienced you are), open up your robots.txt file and add a directive that references your sitemap.
The sitemap directive in robots.txt looks just like this:
Sitemap: https://domainname.com/name-of-sitemap/
Types of Sitemaps
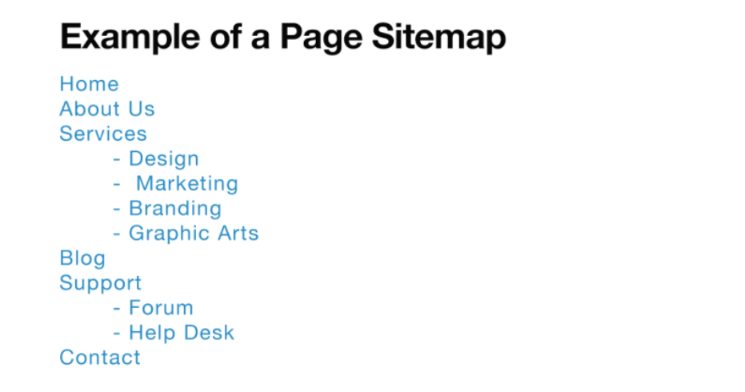
A site map is a navigation tool that helps webmasters identify the most important parts of their sites. A sitemap tells search engines where each piece of content resides on your website. You can use a sitemap to organize your content into categories and subcategories. This makes it easier for crawlers to find what they’re looking for.
There are several types of sitemaps, including XML, HTML, RSS and Atom. Each type has advantages and disadvantages. For example, some sitemaps are better suited for mobile devices while others work well on desktop computers. Some sitemaps are designed to help spiders crawl your entire site while others focus on specific areas.
XML Sitemaps
An XML sitemap works best for large sites with lots of unique content. These sitemaps typically contain the URLs of every page on your site. They’re useful because they give crawlers access to all of your content.
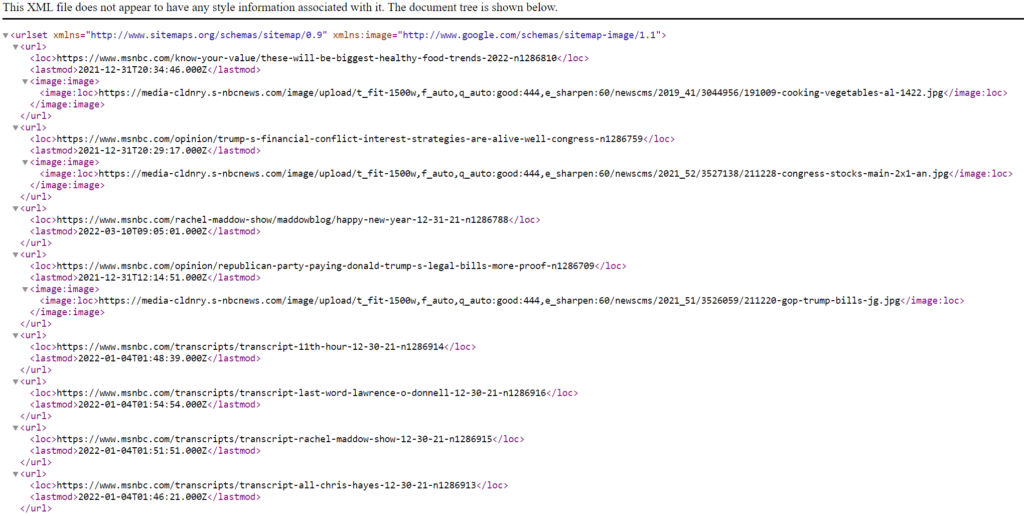
Here is an example of an XML sitemap, on MSNBC.com:
HTML Sitemaps
An HTML sitemap contains a list of links to every page on your site, organized by category. This sitemap is great for smaller sites because it doesn’t require much maintenance. However, it won’t provide crawlers with detailed information about your pages.
XML Image Sitemaps
The introduction of JSON-LD marked the end of the traditional image sitemap. This change meant that search engines could now understand what an image is about without having to download it. However, there are still many benefits to including an image sitemap.
For example, you might want to include an image sitemap because it helps you keep track of where your images are located across multiple URLs. You might also use an image sitemap to make sure that you don’t forget to update your image metadata tags. Another reason to include an image sitemap is if you’re trying to encourage people to take advantage of your visual content.
Including an image sitemap doesn’t mean that your images won’t show up in search results. Search engines will continue to crawl and index your images just like they do everything else on your site.
If you’re wondering why you’d bother creating an image sitemap, the answer is simple. If you have an image sitting around, chances are high that someone will find it via Google Image search. And if you’ve got some great visuals, you’ll probably benefit from being found in search results.
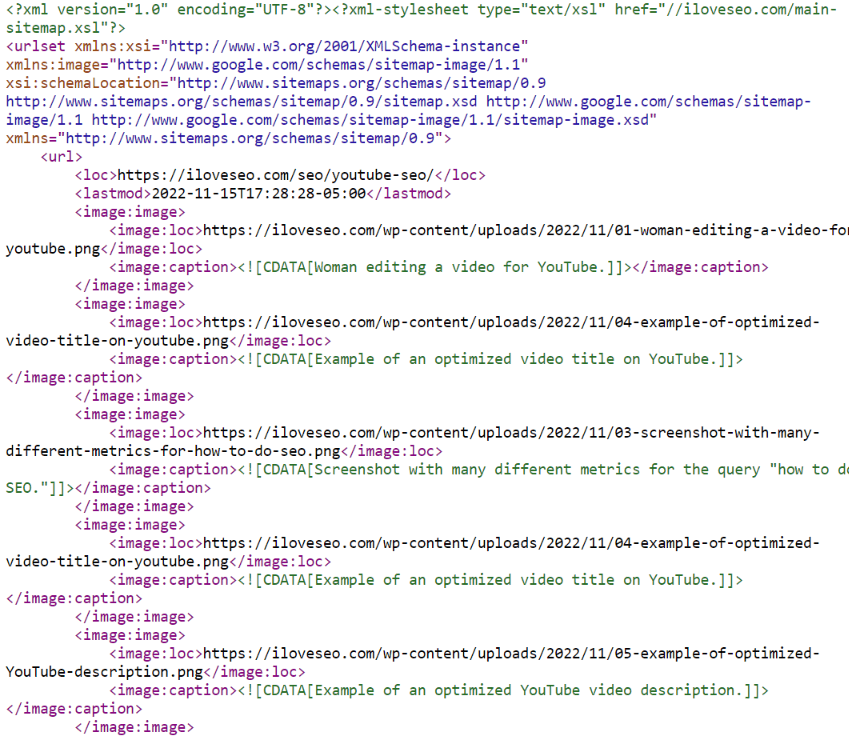
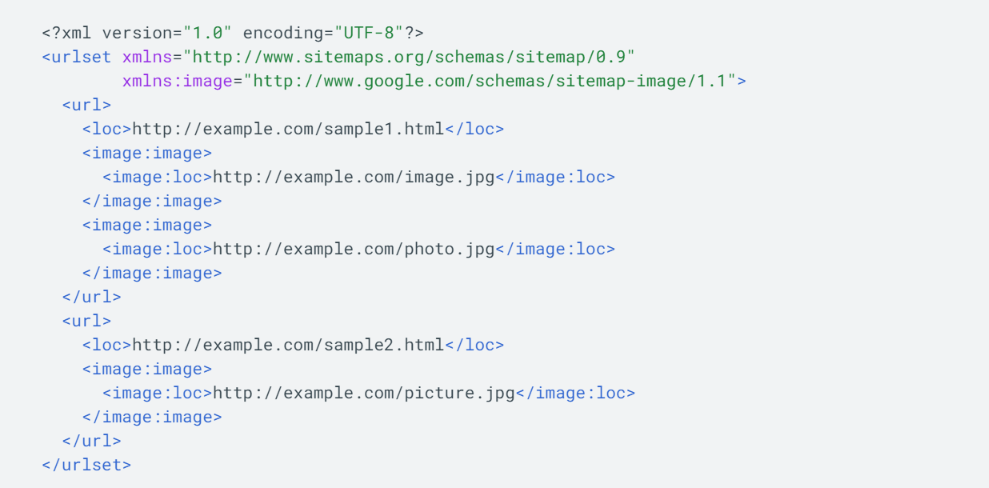
Here is an example of an image XML sitemap:
XML Video Sitemaps
The use of videos in web pages is becoming increasingly popular. In fact, according to Statista, YouTube alone receives over one billion views per day. Videos help businesses gain brand awareness, increase conversions, and improve customer retention. But how do you make sure that your videos are getting indexed properly? An XML video sitemap helps ensure that Google indexes your videos correctly.
A sitemap is a file that lists URLs of each webpage within your site. For example, let’s say you want to add a link to your homepage. You could include it directly on the home page itself, but that doesn’t allow Google to index the URL. Instead, you could include a link to the homepage in a separate HTML document. However, since the homepage is part of the main navigation bar, you don’t want to include the entire navigation bar every time you update the homepage. This is where XML sitemaps come in handy.
An XML sitemap contains a list of URLs that specify what files you want Google to crawl. A typical sitemap includes a root folder containing a list of all the pages on your site, followed by subfolders listing individual pages. Each page listed in the sitemap should contain a link to the corresponding video. For example, here’s a simple XML sitemap for our fictitious eCommerce store. We start with a root folder named /sitemap.xml. Within that folder we include a list of all the products on our site. Each product is listed under a subfolder called /products/. Here are some additional tips to keep in mind when creating an XML sitemap:
Make sure all the pages in your sitemap are accessible via HTTP.
Include links to any videos used in your website.
Use descriptive titles and descriptions for each video.
Keep your sitemap as clean as possible.
Don’t include duplicate or unnecessary information.
Here is an example of a video XML sitemap, which shows one page hosting one video:
Google News Sitemaps
The Google News sitemap allows publishers to submit news stories to Google News, without having to manually enter each URL into the site map. This makes it easier for journalists to add relevant content to Google News. However, there are several things to keep in mind while submitting your sitemap.
Only sites registered with Google News can use this sitemap format. If you aren’t sure whether your site qualifies, contact us.
If you are planning to publish multiple versions of the same story over time, we recommend including the most recent version in your sitemap. You’ll want to make sure that all URLs match exactly, especially those containing dates or times.
You can submit up to 1,000 URLs per sitemap. For example, if you plan to submit 10 different articles about the same topic, you can include up to 10 URLs in one sitemap file.
We recommend updating your sitemap every 2 days. As long as you’ve added new stories since the previous update, they’ll show up in the next sitemap submission.
To ensure that your images are visible to Google News, add alt text to each image.
Here is an example of a Google News sitemap using the news sitemap protocol:
Mobile Sitemaps
If your site includes a special formatted version of it designed for mobile, then we strongly recommend creating a separate mobile sitemap and submitting it to search engines.
This actually allows search engines to serve mobile search requests to users better than if you did it without one, and can lead them to your site’s pages.
Please note that mobile sitemaps should only contain links to pages with mobile content. Otherwise, using a standard XML sitemap is just fine.
General Guidelines for XML Sitemaps
A sitemap helps Googlebot find every page on your site, including dynamic ones like blog posts and comments. Sitemaps are helpful because they tell Google what each page is about, how it relates to other pages on your site, and whether there are any broken links.
The format of a sitemap is fairly simple. Each entry lists one URL per line. If you want to add multiple URLs to a single line, separate them with commas. Also, make sure that the URLs are properly formatted. You can post a sitemap to the same location as your robots.txt file. In addition, it’s worth noting that some web hosts block access to the robots.txt file, so if you cannot see your robots.txt file at the standard address, that’s a likely reason why. You will need to access it directly either in WordPress (if you have a WordPress site) or directly in FTP.
If you have many different types of pages on your site, you’ll probably need several sitemaps. One sitemap could cover general topics, while another might focus specifically on products or services.
For best results, submit your sitemap once every few weeks. Make sure that you update your sitemap whenever you change anything on your site, especially if you make massive changes.
Indexation, Crawling, and Ranking: What’s The Difference?
Indexation vs. crawling and what you need to know about these processes and how they relate to sitemaps. It’s important to learn these differences, because they mean different things.
The term “indexed” often gets thrown around interchangeably with the word “crawled,” but there’s a big difference between the two. Let’s take a look at what each one actually means.
Crawling, however, refers just to the act of the search engine spider crawling your page. It does not include indexation.
For example: Googlebot crawls every URL in your site. This includes images, videos, and even JavaScript files. When Googlebot finds something interesting, such as an image tag or an embedded video, it saves the file locally and adds it to the list of URLs it needs to crawl next time.
Indexation, or indexing, refers to the process after crawling, where Google then simply adds your page to its massive index of pages after they crawl it. The indexing process is where Google examines your page, sees whether or not it’s worth indexing, and decides whether it should file it under “Crawled but not indexed” bucket.
And finally, we arrive at ranking. Ranking refers, of course, to Google’s calculation of the metrics on your site and its final decision of where to place your site at a position within its index.
This is why it’s important to understand crawling vs. indexing vs. ranking, because all three are entirely different processes that should not be interchangeably switched during the course of an SEO discussion.
Consistency
One of the most common mistakes webmasters make is inconsistency in the messages we send to Google about a given URL. This leads to confusion, frustration, and ultimately, less traffic. In fact, it’s one of the biggest reasons why people lose money online.
The problem lies in the fact that there are multiple ways to communicate with Google about a given URL — and sometimes those methods conflict. A common example is blocking a page in robots.txt while including it in an XML sitemap as fully indexable. When Googlebot sees the robots.txt file, it knows what to do, but when it sees the sitemap, it assumes the blocking directive from robots.txt applies instead, so it might not index or crawl the sitemap at all.
Another example is sending a noindex request via meta robots and then adding the same page to an XML sitemap. Both requests tell Googlebot to ignore the page, but since both come from different sources, Google doesn’t know how to interpret the conflicting information.
So how does a webmaster avoid this mess? There are three main options:
- Make sure that your Robots.txt file and meta robots tags are consistent with each other.
- Include important URLs in your sitemap.
- Exclude URLs from your sitemap that are marked noindexed that you want fully deindexed.
Your Server’s Robots.txt File
A robots.txt file is a text document that instructs search engines not to index certain parts of your website. It works like this:
User-agent:
* Disallow: /path/to/file.html
This tells Googlebot not to visit any URLs matching the pattern “/path/to/file.” The user agent string asterisk (“*”) indicates that the robot will follow all instructions in the file.
If you don’t ensure that there is consistency between what’s being indexed by your robots.txt file and what’s indexable via your sitemap, you can accidentally introduce confusion into how Google crawls your site.
XML Sitemaps Aid in Crawling and Indexing
When it comes to XML sitemaps, they are a great tool to help aid webmasters in crawling and indexing their website.
By including the most important URLs down in a hierarchy, it’s possible to show Google all pages at once, especially if your site does not have the correct interlinking.
If you work on consistency and improving your XML sitemaps, it’s possible to achieve a significantly higher indexing rate than normal.
The final step of the process, after crawling and indexing, is ranking. Then the process becomes a little more complex.
When do you plan on creating your own XML sitemap?

